- Posts: 611
- Thank you received: 24
Some random questions...
- Shdwdrgn
-
 Topic Author
- Offline
- User
1) I have not been able to find any details about the seat hinge pins. Are they just a couple short pieces of mild steel? Do they use cotter pins or something to make for easy removal?
2) I noticed that the wiring harness between the two models is quite different. The standard only uses four plugs in the side panel, where the LTD uses all six plugs. Anyone happen to know what features the extra two plugs are providing? Since the wiring on my standard frame has been hacked up, and LTD frame has a complete (and intact) harness, I plan on pulling the full LTD harness and making use of it.
3) To replace the frame on the standard, I will be cutting out all the frame that runs underneath the seat. I have seen it mentioned that when welding on a frame, you need to heat up the completed welds and let them temper back to a non-hardened state. In my case, I am using a wire-feed MIG with mild steel wire. I do not believe this wire air-hardens when it is laid down, so is this something I need to worry about? Is there anything else I should be aware of before I start chopping and welding frame pieces together?
4) Regarding the rear-wheel gears... it appears I have a 41-tooth gear on one bike, and a 38-tooth gear on the other. I'm not looking for something with top-end speed, but rather just general cruising around town, out on the highways, and up in the mountains. I would assume the 41-tooth gear is going to be more appropriate?
5) I Just got a seat in the mail today which appears in great shape, but I get the impression it might actually be the original seat cover. Can anyone suggest something to rub into the seat to help keep the cover soft and help extend the life of it? I don't want to use something like armor-all that leaves it looking like cheap plastic.
6) Does anyone know what the thread is for the screw that holds the back of the gas tank?
Unfortunately it will be mid-September before I get the chance to really start disassembling everything, but this gives me plenty of time to gather information and make sure I know what I'm doing before I screw something up. I have a great collection of parts now, including two complete engines. I plan on doing the frame and engine rebuild over the Winter, then start painting in the Spring once it gets warm enough, and hopefully be riding by next Summer.
1981 KZ1000-JK1
She's a beautiful mess, and I've made her all mine
Please Log in or Create an account to join the conversation.
- nivlac
-

- Offline
- User
- Posts: 109
- Thank you received: 5
1983 kz1100
1979 cb650
Please Log in or Create an account to join the conversation.
- Powerstroke_fan
-
- Offline
- User
- Posts: 1017
- Thank you received: 83
1980 kz1000B4 LTD- 1327cc 9-1 comp
Ported J model head
Psp-3x cams
RS 36s
Welded MK11 crank
Back-cut MK11 trans
MTC 2 stage lock up
Stretched 4-6 over running Hayabusa rear rim with 190 rear tire
Complete frame brace kit installed
And Much Much more- SOLD
2014- ZX14R all stock for now
Please Log in or Create an account to join the conversation.
- 650ed
-

- Offline
- User
- Posts: 15344
- Thank you received: 2829
1977 KZ650-C1 Original Owner - Stock (with additional invisible FIAMM horn)
Please Log in or Create an account to join the conversation.
- Patton
-

- Offline
- KZr Legend
- Posts: 18640
- Thank you received: 2098
650ed wrote: When I had the frame on my old BSA modified to accept a larger engine we welded a piece of solid rod inside the tube where the 2 pieces met to re-enforce the joint. Ed
+1
It's ill-advised to attach anything by simply running a bolt through a diy hole drilled through the frame.
steell wrote: The frame is just mild steel, and the only difficulty drilling is keeping the drill centered.
If I was going to drill the frame, I'd make a boss (a thick walled tube that extends through the frame) and braze it to both sides. That would provide strength and support to the frame and keep the hole from cracking. Like the right front engine mount plate bolt holes.
Brazing a mount to the frame would be better ...
Tig welding would probably be better than brazing, but the equipment is more expensive and it requires more skill.
steell wrote: ... those tubes go all the way through, and that's what we are talking about when we say "boss".
They help to reinforce the frame where it's been drilled.
Good Fortune!
1973 Z1
KZ900 LTD
Please Log in or Create an account to join the conversation.
- Motor Head
-
- Offline
- User
- FIX UP YOUR BIKE RIGHT AND CHEAP
- Posts: 5138
- Thank you received: 391
6) Does anyone know what the thread is for the screw that holds the back of the gas tank?
8 x 1.25mm
2) I noticed that the wiring harness between the two models is quite different. The standard only uses four plugs in the side panel, where the LTD uses all six plugs. Anyone happen to know what features the extra two plugs are providing? Since the wiring on my standard frame has been hacked up, and LTD frame has a complete (and intact) harness, I plan on pulling the full LTD harness and making use of it.
www.kzrider.com/filebase/doc_download/259-z1000j1
www.kzrider.com/filebase/doc_download/260-z1000k1
www.kz1000r.com/downloads/Kawasaki%20KZ1...Service%20Manual.pdf
1982 KZ1000LTD K2 Vance & Hines 4-1 ACCEL COILS Added Vetter fairing & Bags. FOX Racing rear Shocks, Braced Swing-arm, Fork Brace, Progressive Fork Springs RT Gold Emulators, APE Valve Springs, 1166 Big Bore kit, RS34's, GPZ cams.
1980 KZ550LTD C1 Stock SOLD Miss it
1979 MAZDA RX7 in the works, 13B...
Please Log in or Create an account to join the conversation.
- Shdwdrgn
-
 Topic Author
- Offline
- User
- Posts: 611
- Thank you received: 24
Powerstroke_fan -- already got it, thanks. I'm also going to be ordering the correct Clymer manual for my bike today, so I should be set as far as all that goes.
650ed - I hadn't though about a rod inside the frame, but I was considering slicing a pipe in half to wrap around the seam. One of the joints is going to be done in the same place as the factory joint, but the other will be in the middle of a pipe, so reinforcement is a definite consideration.
Patton - I have no intention of drilling any extra holes in the frame, I'm just going to completely remove the section of frame that has been chopped up, and replace it with the pristine section of frame from the LTD. And brazing? I can tell you from experience that brazing won't even hold a bicycle frame together... there is no way in h#!! I would ever trust brazing on a motorcycle frame.
Motor Head - It took me a couple minutes to see it, but it appears that the only thing those extra two connectors control is the auto-off function of the turn signals. This makes me even more glad I was able to get this LTD frame, because I thought the auto-off came stock on all the J bikes, and when I got my bike running, I would have spent hours trying to troubleshoot to figure out why mine didn't work!
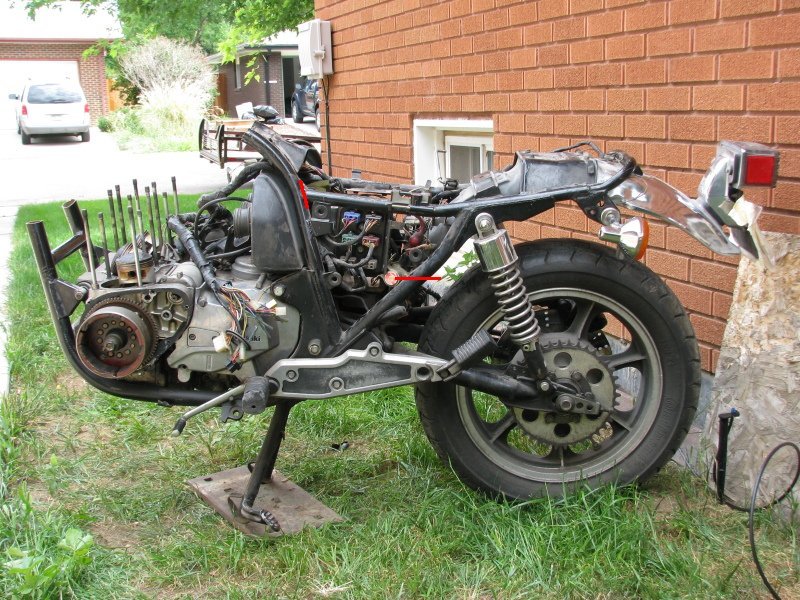
I'll be taking a set of pictures today of the half-bike I picked up yesterday, and try to work up an image showing where I intend on slicing the frames apart. Maybe its time to get started on my own build thread.
1981 KZ1000-JK1
She's a beautiful mess, and I've made her all mine
Please Log in or Create an account to join the conversation.
- Shdwdrgn
-
 Topic Author
- Offline
- User
- Posts: 611
- Thank you received: 24
The cut on the left side will be made flush to the original weld point, so there should be no issues there. The cut on the right side, however, looks like it will take a lot of load from the shocks, so this is where I planned on adding a length of half-pipe over the top of the weld to reinforce the area.
One other bit of good news... the LTD frame has the plate for attaching gas tanks with the screw-down nub at the back. I am in search of a replacement tank in better shape than what I have, so now I can use either style, depending on what I find.
1981 KZ1000-JK1
She's a beautiful mess, and I've made her all mine
Please Log in or Create an account to join the conversation.
- kzz1king
-

- Offline
- User
- Posts: 822
- Thank you received: 52
Wayne
74 Z1 1075, 29 smoothbores, owned and ridden since 1976
Home built KZ1000 turbo setup
www.kzrider.com/forum/11-projects/532476...s-budget-turbo-build
www.kzrider.com/forum/11-projects/532489-74-z-makeover
Please Log in or Create an account to join the conversation.
- Shdwdrgn
-
 Topic Author
- Offline
- User
- Posts: 611
- Thank you received: 24
When you say 'dowel' are you referring to a solid piece of steel inside the frame, or more like a piece of pipe? I was thinking I could make something like a rolled pin, where a piece of heavy pipe is split down the length so that it can expand/compress to fit snugly inside the existing frame. I'll have a lot of extra frame left over when I'm done with the chopping, so I could make up my four pins out of that.
I got most of this frame stripped down this afternoon. I still need to pull the starter wires, then the entire wiring harness will be free (and between the two bikes, I've identified whole, uncut pieces of every section that I can use for the final assembly). Once I pull the rest of the engine off, then I can flip the bike and remove the rear brake, shocks, and wheel, and I'll be done with it.
Speaking of engine, does anyone know what it takes to unscrew the head bolts? Are they torqued into the block some how?
Just random musings... I have two complete rear ends now. I wonder how many people I would upset if I turned my build into a trike? :laugh:
1981 KZ1000-JK1
She's a beautiful mess, and I've made her all mine
Please Log in or Create an account to join the conversation.
- Shdwdrgn
-
 Topic Author
- Offline
- User
- Posts: 611
- Thank you received: 24
Also, can anyone answer my question about removing the long head bolts? Are they torqued really hard, or is there something I didn't see that is keeping them locked in place?
1981 KZ1000-JK1
She's a beautiful mess, and I've made her all mine
Please Log in or Create an account to join the conversation.
- Powerstroke_fan
-
- Offline
- User
- Posts: 1017
- Thank you received: 83
1980 kz1000B4 LTD- 1327cc 9-1 comp
Ported J model head
Psp-3x cams
RS 36s
Welded MK11 crank
Back-cut MK11 trans
MTC 2 stage lock up
Stretched 4-6 over running Hayabusa rear rim with 190 rear tire
Complete frame brace kit installed
And Much Much more- SOLD
2014- ZX14R all stock for now
Please Log in or Create an account to join the conversation.

