
Bored so working on gages
- Cra-z1
-
 Topic Author
- Offline
- User
- Posts: 247
- Thanks: 178
Re: Bored so working on gages
12 Jan 2025 09:47 - 12 Jan 2025 09:49
While filling the gages it's best to add a bit at a time. I added fluid about three times letting it settle and checking the needle action. Once I got the needle action where I wanted it I needed to plug the hole. The smaller hole the better so I'm working on that. The first hole I used a piece of rubber inner tube that I punched out and used super glue to place it. This works well for the tachometer as there is nothing that will touch that plug. However the speedometer needs to be very thin as the milage wheels are very close to the oil housing. At first I used JB weld but them remembered Clay said you have to watch out for interference to the milage wheel. So I scrapped that off and settled on HVAC aluminum tape sealing the edges with superglue as a precaution. You need to make sure you have the surface very clean. Get all that silicon off. I used brake cleaner and Q-tips. I also used a small file and gently filed the surface where I wanted the tape and then more brake cleaner.


Last edit: 12 Jan 2025 09:49 by Cra-z1.
The following user(s) said Thank You: howardhb
Please Log in or Create an account to join the conversation.
- Cra-z1
-
Topic Author
- Offline
- User
- Posts: 247
- Thanks: 178
Re: Bored so working on gages
13 Jan 2025 06:47 - 13 Jan 2025 06:52
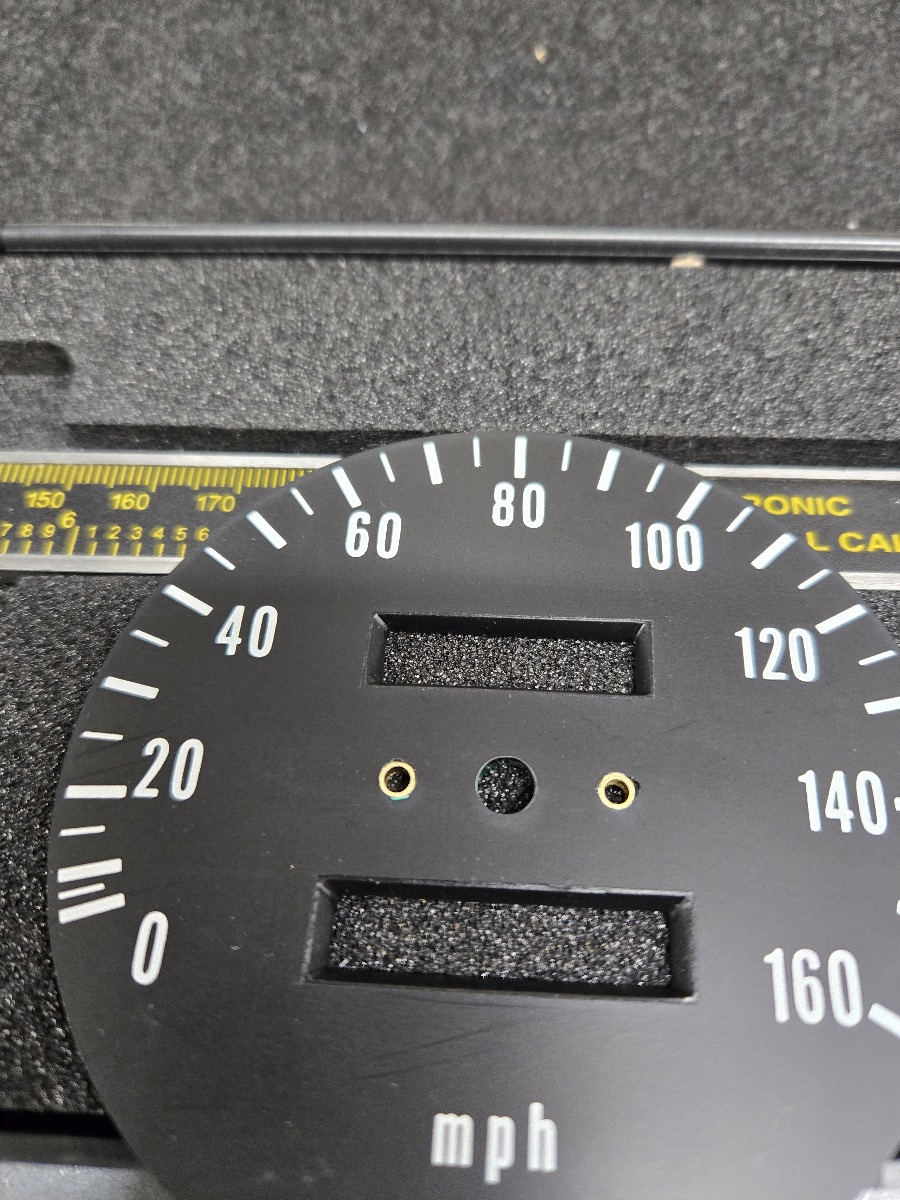
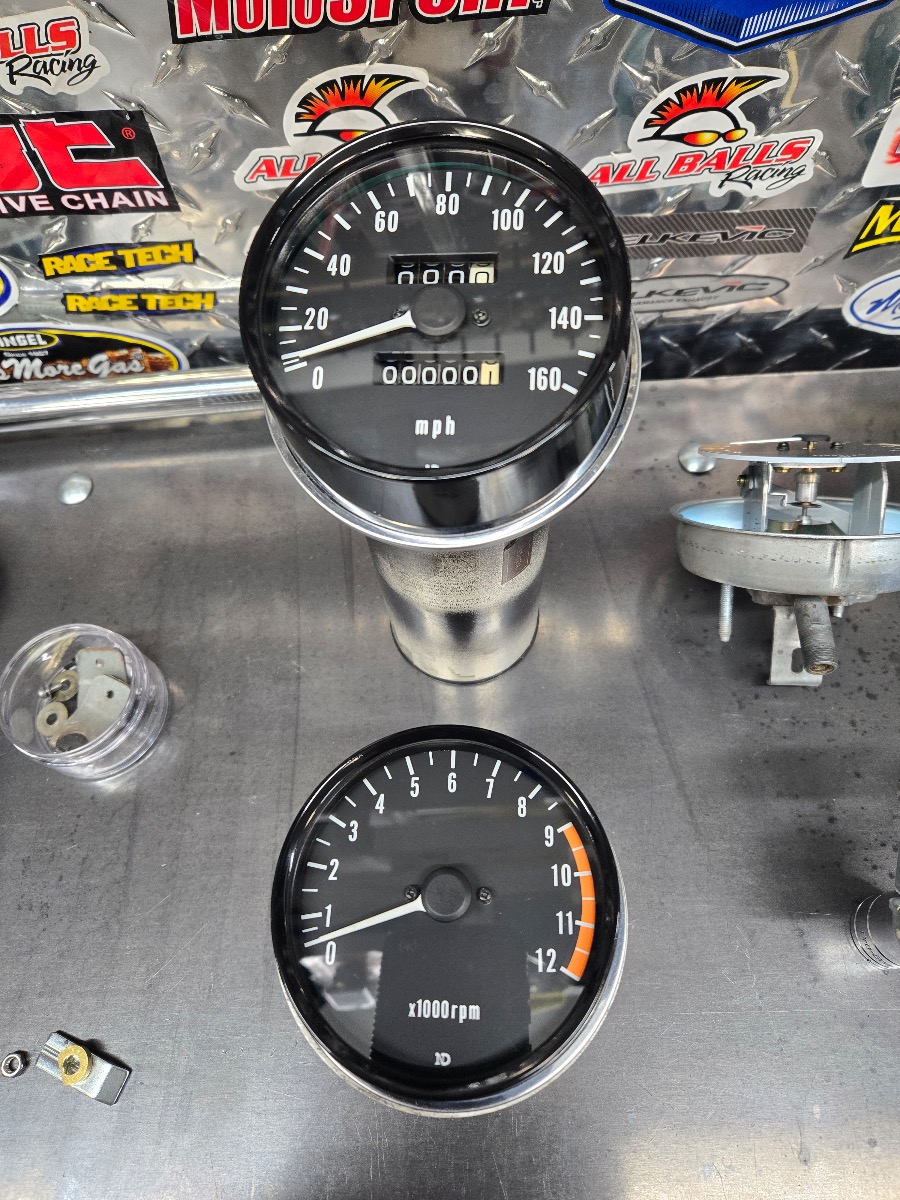
Decided to mount the new faces today which were bought from retro- cycle on ebay. I made a few bushings so there would be minimal pressure on the faces from the screw. I made the bushings a few thou longer than the face plate using a 1/8 brass tube stock bought at Ace. I made sure I removed the burs on the outside of the bushing and that it slipped into the faceplate with just enough clearance to hold it in place. First one took a bit but the other three bushings went quick.
I used a washer abut the correct thickness and built its up to the desired thickness I was aiming for and drilled a 1/8 hole and used it as a jig and just ground and file to size.

I used a washer abut the correct thickness and built its up to the desired thickness I was aiming for and drilled a 1/8 hole and used it as a jig and just ground and file to size.
Last edit: 13 Jan 2025 06:52 by Cra-z1.
The following user(s) said Thank You: howardhb, Wookie58
Please Log in or Create an account to join the conversation.
- Wookie58
-

- Offline
- Moderator
- Posts: 4555
- Thanks: 2696
Re: Bored so working on gages
13 Jan 2025 06:53
Hey Cra-z1 looking at your avatar there must be a potential BOTM amongst that stable ")
1982 KZ1000 Ltd
www.kzrider.com/forum/11-projects/617631...-82-begins?start=192
kzrider.com/filebase-alias?view=download...d-fault-diagnosis&ca
www.kzrider.com/forum/11-projects/617631...-82-begins?start=192
kzrider.com/filebase-alias?view=download...d-fault-diagnosis&ca
Please Log in or Create an account to join the conversation.
- Cra-z1
-
Topic Author
- Offline
- User
- Posts: 247
- Thanks: 178
Re: Bored so working on gages
13 Jan 2025 06:58
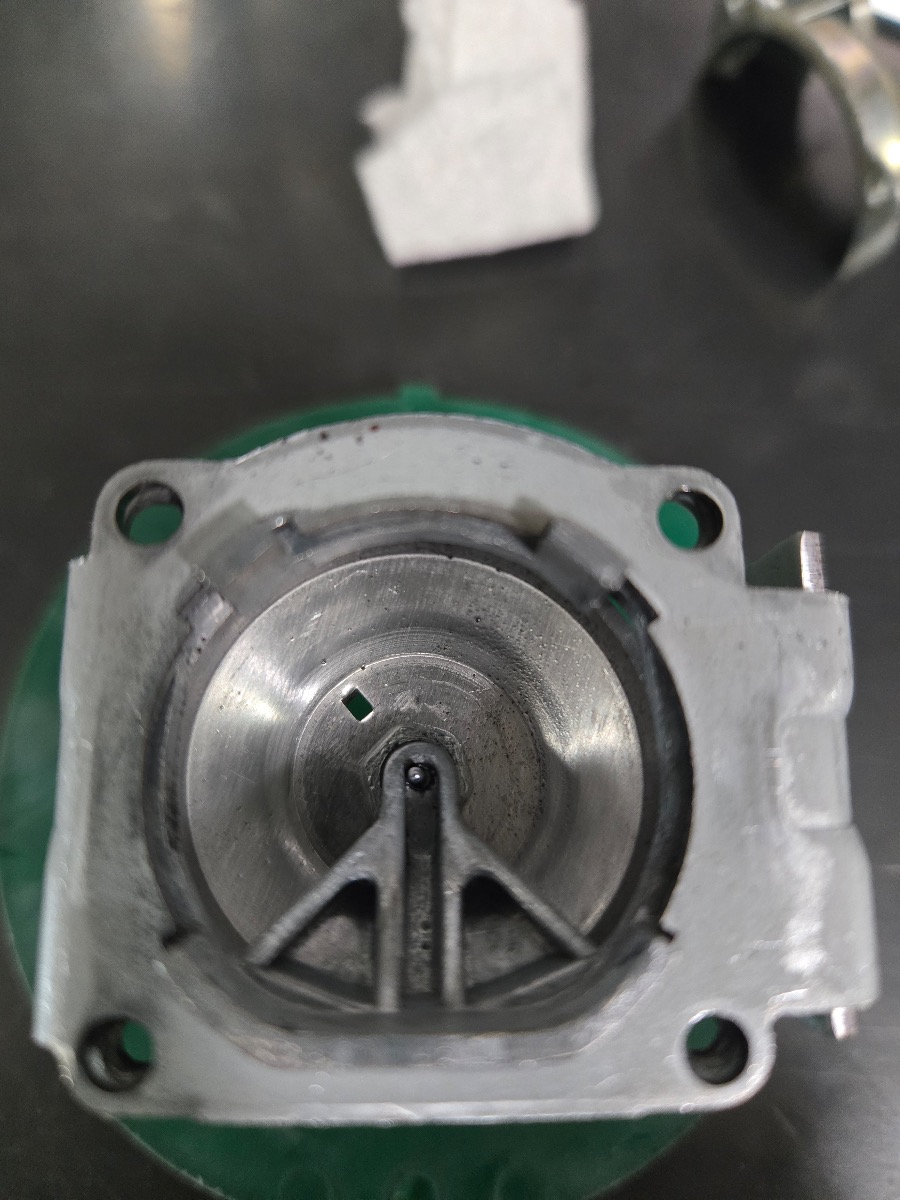
I also looked at a few more gages I have. One I looked at has quite a bit of ware on the lower support underneath the bell drive. If you have a lot of movement here the gage could give you problems so best to remove from service or try to bush the shaft which is what I might try to do. There should be no noticeable movement at this location.

The following user(s) said Thank You: MFP-Joe
Please Log in or Create an account to join the conversation.
- Cra-z1
-
Topic Author
- Offline
- User
- Posts: 247
- Thanks: 178
Re: Bored so working on gages
13 Jan 2025 07:02 - 13 Jan 2025 07:03Hey Cra-z1 looking at your avatar there must be a potential BOTM amongst that stable
Probably. Im just finishing up one I will post in a few weeks.
Last edit: 13 Jan 2025 07:03 by Cra-z1.
The following user(s) said Thank You: Wookie58
Please Log in or Create an account to join the conversation.
- MFP-Joe
-

- Offline
- User
- Posts: 144
- Thanks: 106
Re: Bored so working on gages
13 Jan 2025 08:08
Very good job you´ve done , with good solutions!
Greetings, Joe
Please Log in or Create an account to join the conversation.
- asphalt900
-
- Offline
- User
- Posts: 925
- Thanks: 414
Re: Bored so working on gages
14 Jan 2025 03:18
Something to maybe Help anyone playing with these gauges? I've amassed a large collection of "original faces". Sometimes one doesn't want an aftermarket and would rather maintain some of the patina. Anyhoot, about half of what i have is
 in pic.
The following user(s) said Thank You: Cra-z1
Please Log in or Create an account to join the conversation.
- Cra-z1
-
Topic Author
- Offline
- User
- Posts: 247
- Thanks: 178
Re: Bored so working on gages
14 Jan 2025 07:13 - 14 Jan 2025 07:28
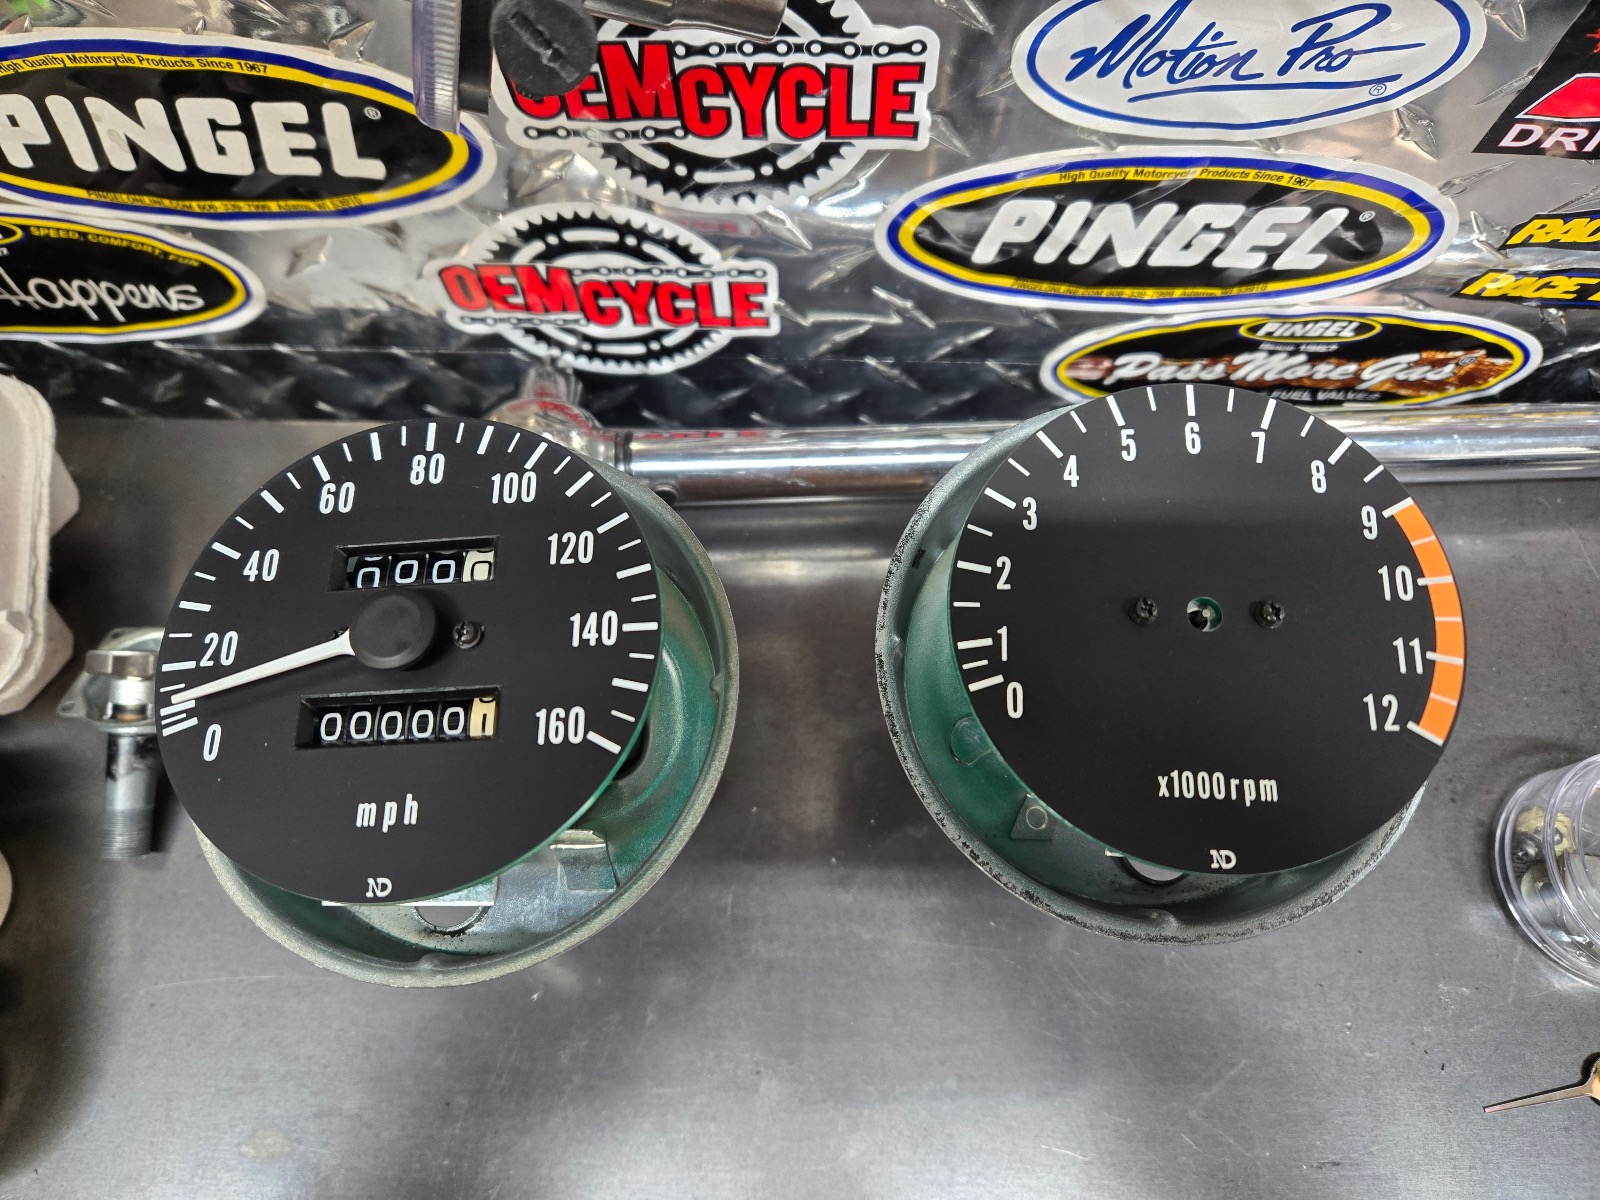
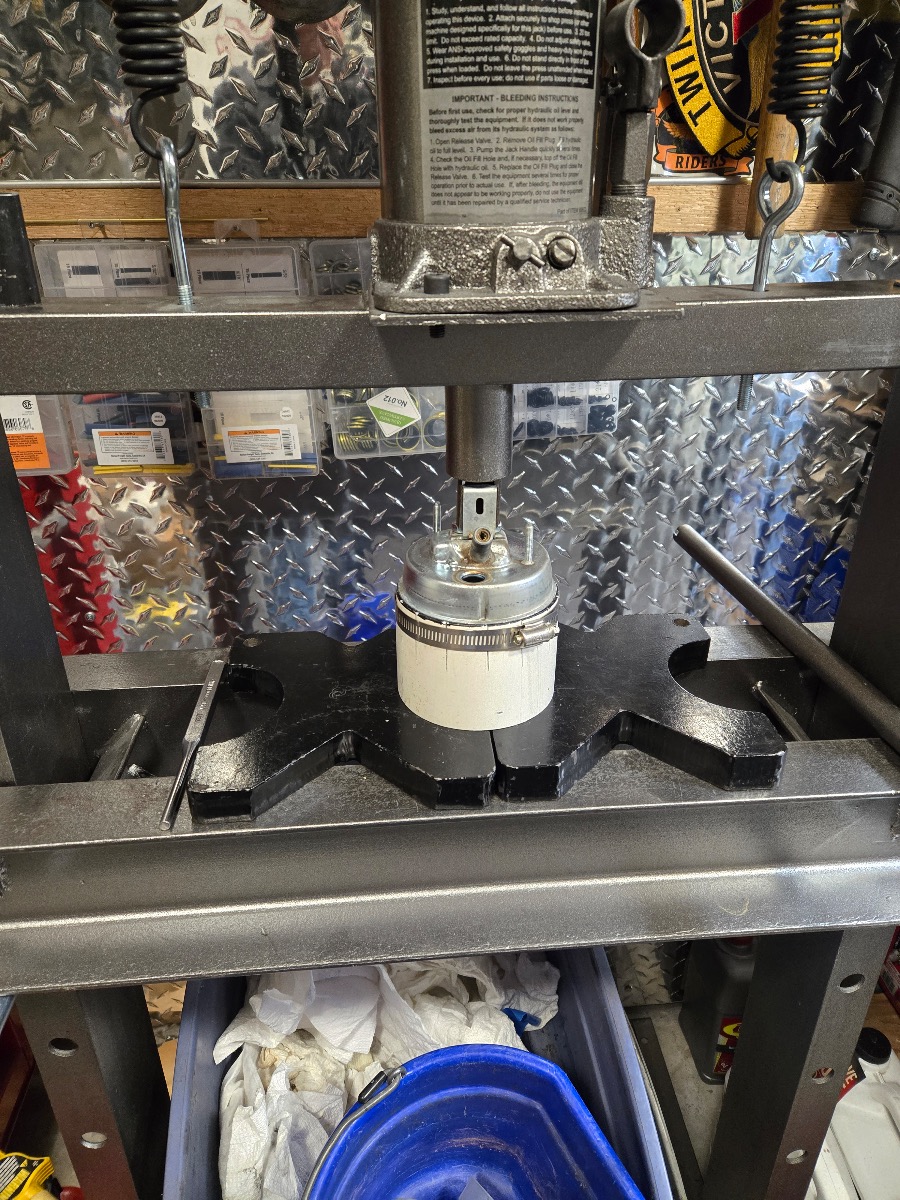
There is a lot of great ideas on this subject. I have been reading the post on the 3d printed dies. Great idea. I had an idea on crimping the ring but it didn't pan out so back to the drawing board. I have a few more ideas spinning in my head but for the meantime I went back to the basics (as in a hammer) to start the crimp then finish with a modified set of pliers so here are the results. I use my press to hold everything snug so I can begin to carefully tap the edges over to about 45 deg or a bit more. I may use a drift to go past 45 deg. Takes about 10 min. At that point the half will stay together and I finish with my pliers. The example below was with new rings. Using the old rings may be a bit easier as they have a memory of the old bend.
I have an another 7 gages to go through but my main goal was to get a good set of spare gages for my early Z1 (OCT 72 BUILD DATE). now I can switch gears and finish a bike I started a few months back now that I have my reworked head


I mentioned I was going to repair some wear to the lower needle shaft bearing. The lower portion of the shaft is just under 1mm. I have ordered some brass tube that measures 1mm id and 2mm od which should be perfect for this repair and will hopefully save these gages that will be hard to find in the years ahead
Again this is the repair that is needed. To much play at this point which may cause erratic needle movement
I have an another 7 gages to go through but my main goal was to get a good set of spare gages for my early Z1 (OCT 72 BUILD DATE). now I can switch gears and finish a bike I started a few months back now that I have my reworked head
I mentioned I was going to repair some wear to the lower needle shaft bearing. The lower portion of the shaft is just under 1mm. I have ordered some brass tube that measures 1mm id and 2mm od which should be perfect for this repair and will hopefully save these gages that will be hard to find in the years ahead
Again this is the repair that is needed. To much play at this point which may cause erratic needle movement
Last edit: 14 Jan 2025 07:28 by Cra-z1.
Please Log in or Create an account to join the conversation.
- Kawasakik1e
-

- Offline
- User
- Posts: 40
- Thanks: 26
Re: Bored so working on gages
14 Jan 2025 14:33
Cra-z1
those gauges look great.... 😃
those gauges look great.... 😃
The Collection-all insured, plated and ridden.
'79 KZ650 EFI/Turbo Project
'76 KZ900 "Workin' Man"
'00 ZRX1100 The Beast
'09 H-D XR1200 "XR8ted"
'79 KZ650 EFI/Turbo Project
'76 KZ900 "Workin' Man"
'00 ZRX1100 The Beast
'09 H-D XR1200 "XR8ted"
The following user(s) said Thank You: Cra-z1
Please Log in or Create an account to join the conversation.
- Cra-z1
-
Topic Author
- Offline
- User
- Posts: 247
- Thanks: 178
Re: Bored so working on gages
26 Jan 2025 12:40 - 26 Jan 2025 12:50
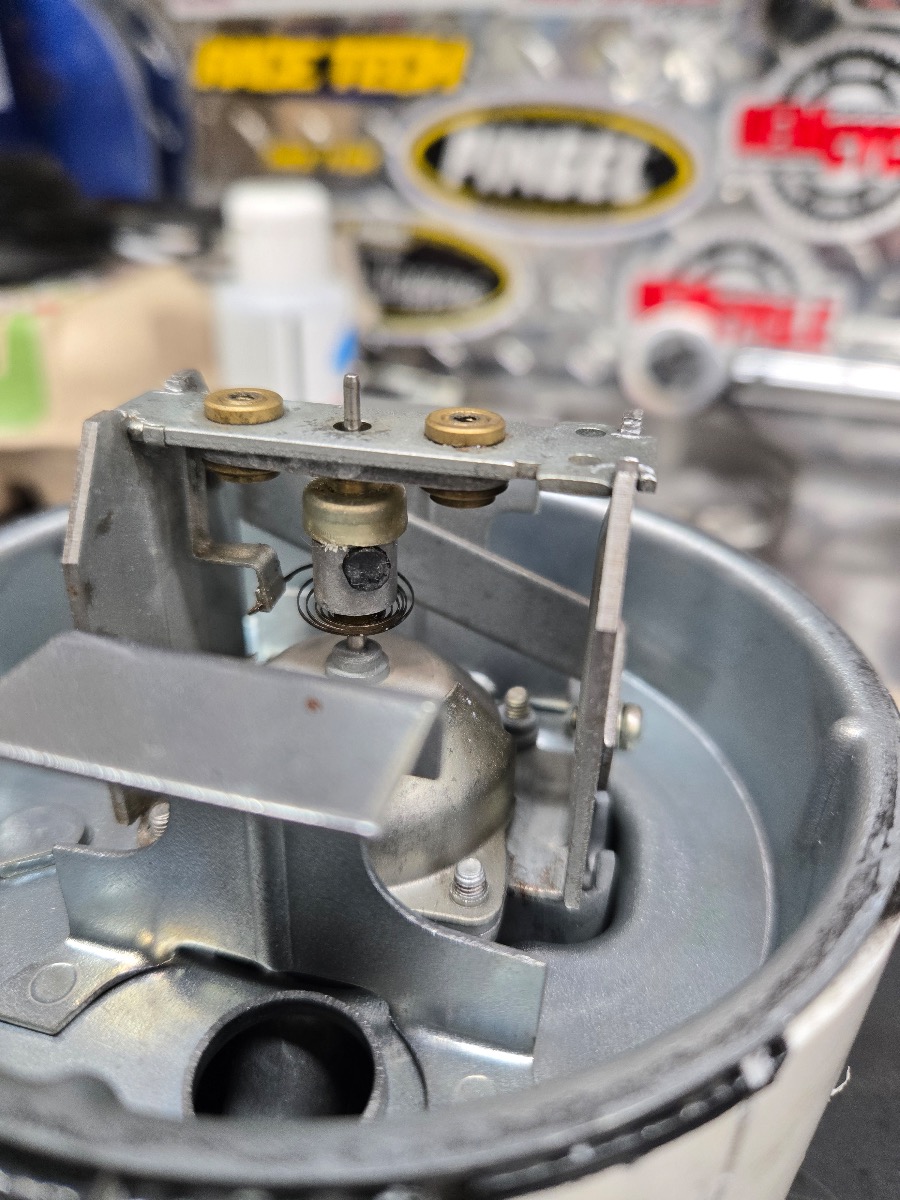
So to continue with saving these gages which will become rare and expensive in the future the next step is to correct the excessive wear on that lower shaft support. I finally received my brass 2mm od x 1mm id tube stock. found it on ebay and of course it came from china. The first step is to separate the components. You need to carefully grind the little crimps on the bridge that hold the shaft, damper cylinder and spring. Dremmel cut off wheels work great.

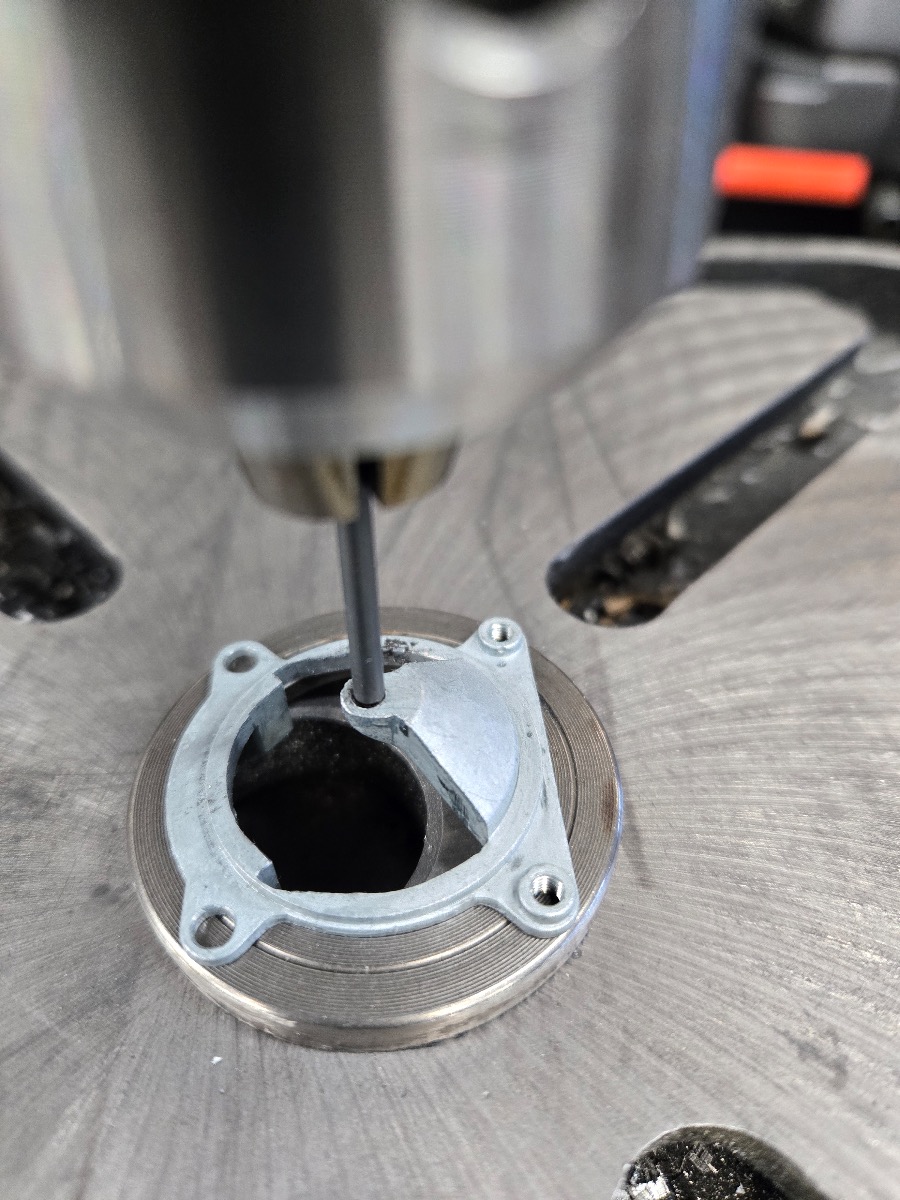
After you gently pry the bridge assembly off you can get at the lower support bearing to drill to 2mm. I use a 7/64 drill to center the support. There is a small divit which measures pretty close to 7/64. You have to devise a way to hold things. I keep a lot of old races and it just so happened one worked to hold the support. I position the 7/64 drill bit and was careful not to move anything as I switched to the 2mm bit and just held everything with my fingers. I was going to make a jig but this worked for me.

Now it's time to make the bearing using the brass rod. I hand filed the end and put a small taper on it and cleaned the bore with a .9mm drill bit by gently sliding it in and out (with my hand) of the bore. Then I cut off a 1/4 inch piece or so. I used the tapered end to gently check the fit to the support. Try to get it to fit with just a bit of resistance. You can use the 2mm drill bit by hand to ream it a bit. Once you can slide it in the support you can file it down a bit to get the smallest workable part. You need to ream that bearing and check it with the shaft. When you get it feeling nice you can assemble things for a test. The bridge should slide on the mounts with little problem check that first. The support should look like this with not to much sticking out the top


With thing assembled and no binding on the bearing you can lock things in place. I like to use Locktite 609 retainer compound which is great for interference fits like we have here. Using a tooth pick I put a small dab on the bearing. I gently pushed the bearing through to expose the od applied a very small amount of 609 and then slide that bearing back so I had just a bit showing on the top. I rechecked everything before moving to the bridge. To secure the bridge I pryed it up just a bit to expose the inside edges and applied 609 and pushed everything back in place firmly. Again I checked to make sure the bell moved freely and did not bind. I had to tap the bridge just a bit to align things and make Sure the bell moved freely and was not biding. Once satisfied I left it to dry. Loctite 609 will lock everything after setting up. It takes a while so if you screw up you can take thing apart and recheck your work. So now I have an operational unit ready for new faces.

After you gently pry the bridge assembly off you can get at the lower support bearing to drill to 2mm. I use a 7/64 drill to center the support. There is a small divit which measures pretty close to 7/64. You have to devise a way to hold things. I keep a lot of old races and it just so happened one worked to hold the support. I position the 7/64 drill bit and was careful not to move anything as I switched to the 2mm bit and just held everything with my fingers. I was going to make a jig but this worked for me.
Now it's time to make the bearing using the brass rod. I hand filed the end and put a small taper on it and cleaned the bore with a .9mm drill bit by gently sliding it in and out (with my hand) of the bore. Then I cut off a 1/4 inch piece or so. I used the tapered end to gently check the fit to the support. Try to get it to fit with just a bit of resistance. You can use the 2mm drill bit by hand to ream it a bit. Once you can slide it in the support you can file it down a bit to get the smallest workable part. You need to ream that bearing and check it with the shaft. When you get it feeling nice you can assemble things for a test. The bridge should slide on the mounts with little problem check that first. The support should look like this with not to much sticking out the top
With thing assembled and no binding on the bearing you can lock things in place. I like to use Locktite 609 retainer compound which is great for interference fits like we have here. Using a tooth pick I put a small dab on the bearing. I gently pushed the bearing through to expose the od applied a very small amount of 609 and then slide that bearing back so I had just a bit showing on the top. I rechecked everything before moving to the bridge. To secure the bridge I pryed it up just a bit to expose the inside edges and applied 609 and pushed everything back in place firmly. Again I checked to make sure the bell moved freely and did not bind. I had to tap the bridge just a bit to align things and make Sure the bell moved freely and was not biding. Once satisfied I left it to dry. Loctite 609 will lock everything after setting up. It takes a while so if you screw up you can take thing apart and recheck your work. So now I have an operational unit ready for new faces.
Last edit: 26 Jan 2025 12:50 by Cra-z1.
The following user(s) said Thank You: howardhb, kimchella
Please Log in or Create an account to join the conversation.
- Cra-z1
-
Topic Author
- Offline
- User
- Posts: 247
- Thanks: 178
Re: Bored so working on gages
29 Jan 2025 15:03 - 29 Jan 2025 15:06
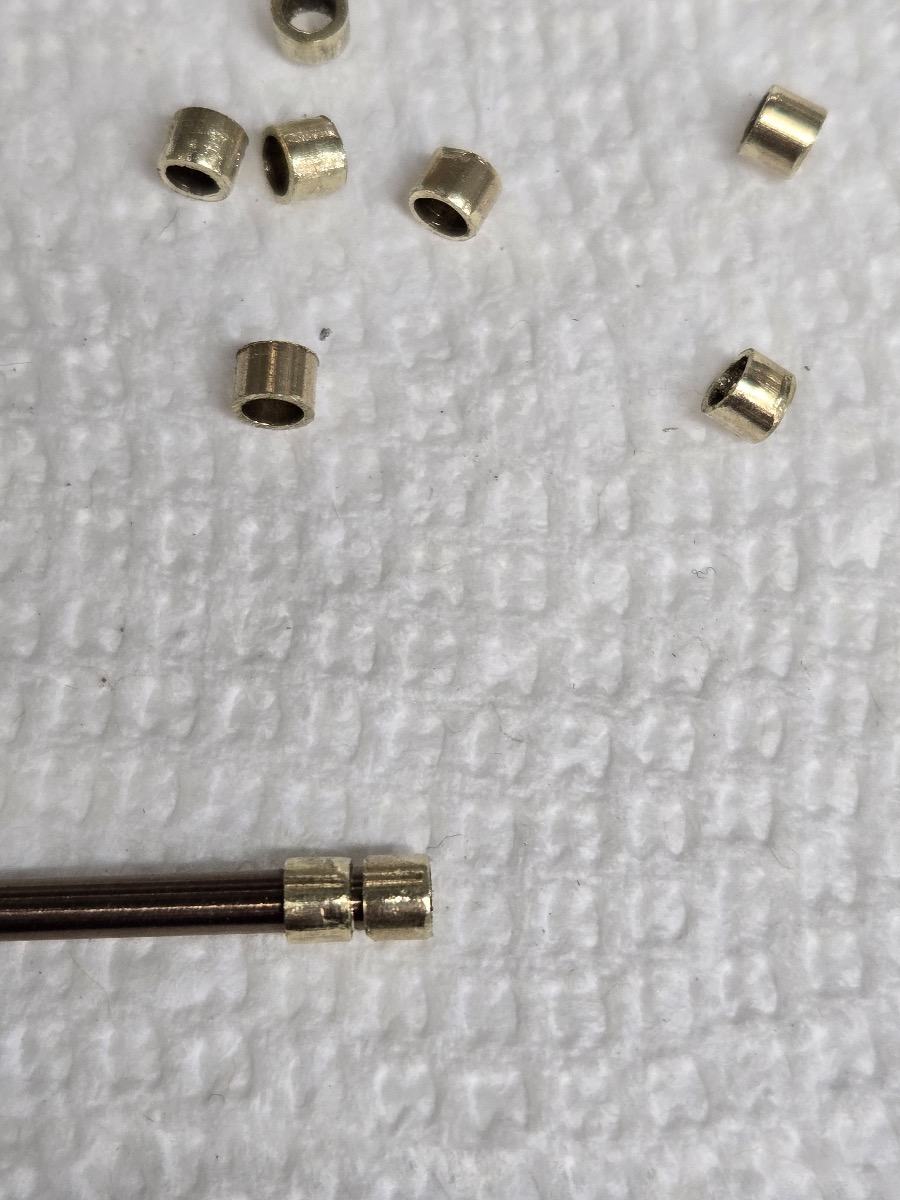
While waiting for my face plates to arrive from Retro cycle I decided to make the bushings needed for the face plates. I was using a washer with a 1/8 hole drilled and then filing to the proper size but I ended up with a slight taper on one end rather than a square end. So my solution was to use a 3/32 drill and bond a sleeve exposing the right dimension needed. I shoot for .096-.098 for the bushing using Retro's faces. Other faces may use a different dimension. The results were a much straighter bushing with not much taper. In the photo you can see a few I made with the washer and you can see a taper. Now it only takes a few minutes to make a bushing. I file one end of the tube straight then cut it off with a Dremmel wheel slightly longer, then insert on the the sleeved drill bit and hand file till I start to hit the end of the drill bit. Some of those I will need to remake and debur.
Last edit: 29 Jan 2025 15:06 by Cra-z1.
Please Log in or Create an account to join the conversation.
- asphalt900
-
- Offline
- User
- Posts: 925
- Thanks: 414
Re: Bored so working on gages
29 Jan 2025 15:34
You've come soo far Crazy!! Can i show you a better and easier way to do that lower diecast holder? I'll dig out the stuff i used to do years ago, much much easier then cutting out slugs of tubing.
The following user(s) said Thank You: Cra-z1
Please Log in or Create an account to join the conversation.